签到 抓包然后把pass=false改为true。
喜欢做签到的CTFer你们好呀
猫咪问答 第一题
第二题 去搜每一年的选手writeup,有些选手会截图排名,里面有参加人数。
第三题 论文里有336这个数字。
第四题
第六题 1 2 3 4 5 6 7 8 9 10 from transformers import AutoTokenizerfrom huggingface_hub import loginlogin("TOKEN" ) tokenizer = AutoTokenizer.from_pretrained("meta-llama/Meta-Llama-3-70B" ) text = """<!DOCTYPE html> ... """ tokens = tokenizer.tokenize(text) num_tokens = len (tokens) print (f"Number of tokens in your text: {num_tokens} " )
打不开的盒 去3d打印文件在线浏览网站操作一下就行。
每日论文太多了 在pdf搜flag可以看到一个隐藏的flag here文本。转word然后移开哪里的东西,可以看到一个被覆盖在底层的flag图片。
比大小王 抓包可以看到100对数字。在结束前改掉js里要发送的那个变量。
旅行照片 4.0 问题1 百度地图搜索。
问题2 搜索看到B站一个up主发的视频,评论区询问得知活动日期是发布日期前几天,枚举。
问题4 搜图可以得到。
问题3 由于问题4正确性比较确定,所以直接枚举安徽所有2字公园。
问题5 没做出来。
问题6 可以搜到是怀密号,CRH6A-A
不宽的宽字符 打印中间变量并测试可以发现,似乎每3个字符在MultiByteToWideChar后变成两个.
对flag里的每两个字符爆破。
最后加的 you_cant_get_the_flag,使用\0截断处理。
1 2 3 4 5 6 7 8 9 10 11 12 13 14 15 16 17 18 19 20 21 22 23 24 25 26 27 28 29 30 31 32 33 #include <windows.h> #include <stdio.h> int main () char inputBuffer[256 ] = { 0 }; for (int i = 0 ; i < 256 ; i++) { for (int j=0 ;j<256 ;j++){ for (int k=0 ; k<256 ; ++k) { inputBuffer[0 ] = i; inputBuffer[1 ] = j; inputBuffer[2 ] = k; wchar_t buf[256 ] = { 0 }; char * ptr_buf = (char *)buf; MultiByteToWideChar (CP_UTF8, 0 , inputBuffer, -1 , buf, sizeof (buf) / sizeof (wchar_t )); if ((unsigned char )ptr_buf[0 ] == 0x0 && (unsigned char )ptr_buf[1 ] != 0x0 ) { printf ("buf ascii of ijk (char)0x%x, (char)0x%x, (char)0x%x\n" , (unsigned char )i, (unsigned char )j, (unsigned char )k); for (int i = 0 ; i < 4 ; i++) { printf ("%x " , (unsigned char )ptr_buf[i]); } printf ("\n" ); } } } } }
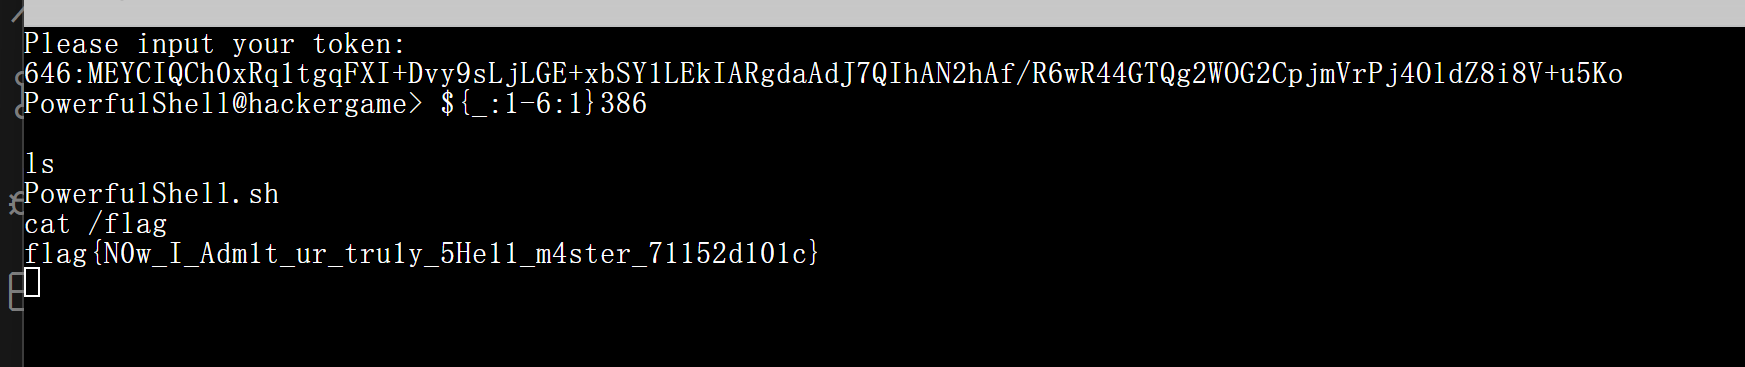
PowerfulShell 搜索那些没被过滤的字符,学习它们的用法。
$_获取在此之前执行的命令或者脚本的最后一个参数。也就是input。
再用一些字符串截断技巧,得到:
1 2 3 4 5 # i: ${_:1-6:1} # n: ${_:1:1} # p: ${_:2:1} # u: ${_:3:1} # t: ${_:4:1}
接下来按理说应该构造命令然后去获得其他字母。理论上 ip nt是可以获得很多输出,但是题目环境没这个命令,比较棘手。
所以去题目环境 $PATH目录下,用正则表达式搜索,看看有哪些input可以构造出的命令。
发现一个 i386,敲一下发现直接获得了shell。。还是比较意外的。
所以只需要${_:1-6:1}386,然后cat /flag
Node.js is Web Scale 看到那些键值访问就想到了这种比赛天天出的原型链污染 。利用这个特性给cmd加上一个自己的命令。
PaoluGPT 第一题爬虫。
第二题sql注入,获得shown=false的那些条目,就是flag。
强大的正则表达式 easy 16可以被10000整除。所以枚举出所有可能的最低4位数。
medium/hard 这两题是一样的,问gpt会知道一个叫DFN的东西,简单学习后可以编写出对应的状态机。
然后就是从状态机构造正则表达式。一开始尝试自己构造,但总是过长。后来找到了从gpt得知pyformlang这个工具,可以自动构造。
但是构造出来的表达式无法通过题目测试,用ctrl点进去这个库看注释,发现它用了自己的一套语法,所以手动给纠正过来。
也就是
1 print(str(regex).replace(".", ""))
(他好像说是用了 .来表示拼接?)
1 2 3 4 5 6 7 8 9 10 11 12 13 14 15 16 17 18 19 20 21 22 23 24 25 26 27 28 29 30 31 32 33 34 35 36 37 38 39 40 41 42 43 44 45 46 47 48 49 50 51 52 53 54 55 56 57 58 59 60 61 62 63 64 65 66 67 68 import randomimport refrom pyformlang.finite_automaton import DeterministicFiniteAutomaton, Statefrom pyformlang.regular_expression import Regextransitions = { 'q0' : {'0' : 'q0' , '1' : 'q1' }, 'q1' : {'0' : 'q2' , '1' : 'q3' }, 'q2' : {'0' : 'q4' , '1' : 'q5' }, 'q3' : {'0' : 'q6' , '1' : 'q7' }, 'q4' : {'0' : 'q8' , '1' : 'q9' }, 'q5' : {'0' : 'q10' , '1' : 'q11' }, 'q6' : {'0' : 'q12' , '1' : 'q0' }, 'q7' : {'0' : 'q1' , '1' : 'q2' }, 'q8' : {'0' : 'q3' , '1' : 'q4' }, 'q9' : {'0' : 'q5' , '1' : 'q6' }, 'q10' : {'0' : 'q7' , '1' : 'q8' }, 'q11' : {'0' : 'q9' , '1' : 'q10' }, 'q12' : {'0' : 'q11' , '1' : 'q12' } } dfa = DeterministicFiniteAutomaton() start_state = State("q0" ) dfa.add_start_state(start_state) dfa.add_final_state(start_state) for state, moves in transitions.items(): for symbol, target in moves.items(): dfa.add_transition(State(state), symbol, State(target)) regex = dfa.to_regex() print (str (regex).replace("." , "" ))print (regex.accepts("101000001010110111100000001010001011000111000110100011000001111" ))def matches_regex (pattern, test_string ): regex = re.compile (pattern) if regex.fullmatch(test_string): return True else : return False def generate_random_binary (is_multiple_of_13=True ): if is_multiple_of_13: number = random.randint(1 , 2 **5 ) * 13 else : number = random.randint(1 , 10000 ) binary_representation = bin (number)[2 :] print (f"number: {number} , binary: {binary_representation} " ) return binary_representation binary = generate_random_binary() if matches_regex(str (regex).replace("." , "" ), binary): print ("Matched" ) else : print ("Not matched" )
优雅的不等式 只会做第一问,就是手动构造一下完事了。第二问尝试了对$\frac{1}{1+x^2}$泰勒展开,但是精度不够。
惜字如金 3.0 A题 完形填空。
B题 hash那个函数,可以用模数为合数的二次剩余和线性同余方程直接解,网上有相关代码,于是得到crc的返回结果。
观察crc函数发现,当两个输入input1和input2,只有最后一个字节不同,且不同之处为这个字节的最高位bit时,crc(input1) ^ crc(input2) == flip。
所以可以获得flip,推出原文。
1 2 3 4 5 6 7 8 9 10 11 12 13 14 15 16 17 18 19 20 21 22 23 24 25 26 27 28 29 30 31 32 33 34 35 36 37 38 39 40 41 42 43 44 45 46 47 48 49 50 51 52 53 54 55 56 57 58 59 60 61 62 63 64 65 66 67 68 69 70 71 72 73 74 75 76 77 78 79 80 81 82 83 84 85 86 87 88 89 90 91 92 93 94 95 96 97 98 99 100 101 102 103 104 105 106 107 108 109 110 111 112 113 114 115 116 117 118 119 120 121 122 123 124 125 126 127 128 129 130 131 132 133 134 135 136 137 138 139 140 141 142 143 144 145 146 147 148 149 150 151 152 153 154 155 156 157 158 159 160 161 162 163 164 165 166 import itertoolsflips = ['0xe6022de643a7' , '0x66022de643a7' , '0xf9fdd219bc58' , '0x79fdd219bc58' , '0xa6022de643a7' , '0x26022de643a7' , '0xb9fdd219bc58' , '0x39fdd219bc58' ] flip = int (flips[1 ], 16 ) def crc (input : bytes int : poly_degree = 48 print ("flip: " , hex (flip)) digest = (1 << poly_degree) - 1 for b in input : digest = digest ^ b for _ in range (8 ): digest = (digest >> 1 ) ^ (flip if (digest & 1 ) == 1 else 0 ) return digest ^ ((1 << poly_degree) - 1 ) def hash (input : bytes bytes : digest = crc(input ) u2, u1, u0 = 0xDFFFFFFFFFFF , 0xFFFFFFFFFFFF , 0xFFFFFFFFFFFF assert (u2, u1, u0) == (246290604621823 , 281474976710655 , 281474976710655 ) digest = (digest * (digest * u2 + u1) + u0) % (1 << 48 ) return digest.to_bytes(48 // 8 , 'little' ) def sqrt_mod_2k (a, k ): """ 解模为 2^k 的二次剩余问题 a: 给定的二次剩余的值 k: 2^k 作为模数 返回:所有可能解的列表 """ from sympy.ntheory.residue_ntheory import _sqrt_mod_prime_power, _sqrt_mod1 from sympy.polys.galoistools import gf_crt from sympy.polys.domains import ZZ from sympy.ntheory.residue_ntheory import _sqrt_mod_prime_power from itertools import product n = 2 **k factors_of_n = {2 : k} x = [] p = [] for p_i, e_i in factors_of_n.items(): if a % p_i == 0 : x_i = _sqrt_mod1(a, p_i, e_i) else : x_i = _sqrt_mod_prime_power(a, p_i, e_i) x.append(x_i) p.append(p_i**e_i) solutions = [] for combin_x in product(*x): r = gf_crt(combin_x, p, ZZ) solutions.append(int (r) % (2 **k)) return solutions def modular_division (a, b, m ): global xx, yy xx, yy = 1 , 0 def exgcd (a, b ): global xx, yy if b == 0 : xx, yy = 1 , 0 return a d = exgcd(b, a % b) xx, yy = yy, xx yy -= (a // b) * xx return d d = exgcd(a, m) if b % d != 0 : raise ValueError("No solutions" ) base_solution = xx * (b // d) % m solutions = [] t = m // d for k in range (d): solutions.append((base_solution + k * t) % m) return solutions input_bytes = b" poly, poly_degree = 'CCCCCCCCCCCCCCCCCCCCCCCCCCCCCCCCCCCCCCCCCCCCCCCCC', 48!" digest_hex = "71d3dbb1a7d0" calc_hash = hash (input_bytes).hex () print ("calc_hash" , calc_hash)digest_hex2 = '' for i in range (0 , len (digest_hex), 2 ): digest_hex2 = digest_hex[i:i+2 ] + digest_hex2 digest2 = int (digest_hex2, 16 ) u2, u1, u0 = 0xDFFFFFFFFFFF , 0xFFFFFFFFFFFF , 0xFFFFFFFFFFFF a = u2 b = u1 c = u0 - digest2 B = (b*b-4 *a*c) % 2 **48 A_list1 = sqrt_mod_2k(B, 48 ) A_list = A_list1.copy() for A in A_list1: if (-A) % (2 **48 ) not in A_list: A_list.append((-A) % (2 **48 )) assert all ([A**2 % 2 **48 == B for A in A_list])digest_list = [] for A in A_list: digest_list.extend(modular_division(2 *a, A-b, 2 **48 )) assert all ([(digest*a*2 +b)%(1 <<48 ) in A_list for digest in digest_list])print ("possilbe digests: " , [hex (x) for x in digest_list])possible_digest1 = ['0x152a08169c63' , '0x952a08169c63' , '0xcad5f7e9639c' , '0x4ad5f7e9639c' , '0xd52a08169c63' , '0x552a08169c63' , '0x8ad5f7e9639c' , '0xad5f7e9639c' ] possible_digest2 = ['0xf32825f0dfc4' , '0x732825f0dfc4' , '0xecd7da0f203b' , '0x6cd7da0f203b' , '0xb32825f0dfc4' , '0x332825f0dfc4' , '0xacd7da0f203b' , '0x2cd7da0f203b' ] possible_flips = [] for digest1, digest2 in itertools.product(possible_digest1, possible_digest2): if hex (int (digest1, 16 ) ^ int (digest2, 16 )) not in possible_flips: possible_flips.append(hex (int (digest1, 16 ) ^ int (digest2, 16 ))) print ("possible flips: " , possible_flips)
(代码比较乱,需多次修改多次运行)
C题 还是可以用第二题的方法得到很多C那一行。
我们现在获得了flip,可以预测任意输入的哈希,所以让他返回哈希已经没有什么用了。考虑让他返回data。
可以想到让他返回 answer_c.txt的data。也就是构造一个字符串,让他的crc经过base85刚好是 answer_c.
也就是需要从crc的输出,构造出一个合法的输入。可以用z3solver解,暴力串行跑一个晚上可以出来。理论上可以并行85倍。
也可以优化:计算出what_digest_add_chr_x_to_get_digest_y。也就是已知一个crc和它的输入的最后一个字符,可以求出去掉这个字符后的crc。
(虽然优化写了但是懒得加进去,暴力跑一个晚上就完事了)
1 2 3 4 5 6 7 8 9 10 11 12 13 14 15 16 17 18 19 20 21 22 23 24 25 26 27 28 29 30 31 32 33 34 35 36 37 38 39 40 41 42 43 44 45 46 47 48 49 50 51 52 53 54 55 56 57 58 59 60 61 62 63 64 65 66 67 68 69 70 71 72 73 74 75 76 77 78 79 80 81 82 83 84 85 86 87 88 89 90 91 92 93 94 95 96 97 98 99 100 101 102 103 104 105 106 107 108 109 110 111 112 113 114 115 116 117 118 119 120 121 122 123 124 125 126 127 128 129 130 import base64import itertoolsfrom change_file import modify_file_lineimport stringfrom z3 import *def z3_crc48 (data, poly=0xf9fdd219bc58 , num_bytes=80 ): crc = BitVecVal((1 << 48 ) - 1 , 48 ) for i in range (num_bytes): byte = Extract((num_bytes - i - 1 ) * 8 + 7 , (num_bytes - i - 1 ) * 8 , data) crc = crc ^ ZeroExt(48 - 8 , byte) for _ in range (8 ): crc = If( crc & 1 == 1 , LShR(crc, 1 ) ^ poly, LShR(crc, 1 ) ) return crc ^ ((1 << 48 ) - 1 ) def send_post (): import requests url = "http://202.38.93.141:19975/answer_c.py" with open ("secret3_2.py" , 'rb' ) as f: data = f.read() response = requests.post(url, data=data) print (response.text) return int (response.text.split("(" )[1 ].split(")" )[0 ], 16 ) num_bytes = 80 flags = ["" ]*64 for i in range (0 , 64 ): target_crc = 0x4402c8f3cfaa position = 63 - i num_bytes = 64 for flag_chr in string.printable: s = Solver() input_bits = BitVec('input_bits' , 8 *num_bytes) calculated_crc = z3_crc48(input_bits, num_bytes=num_bytes) s.add(calculated_crc == target_crc) for j in range (position+1 , 64 ): s.add(Extract((63 -j)*8 +7 , (63 -j)*8 , input_bits) == ord (flags[j])) s.add(Extract(i*8 +7 , i*8 , input_bits) == ord (flag_chr)) solution = None while s.check() == sat: model = s.model() recovered_input_int = model[input_bits].as_long() recovered_input = recovered_input_int.to_bytes(num_bytes, 'big' ) if b"\n" not in recovered_input and b"\r" not in recovered_input: solution = recovered_input break s.add(input_bits != recovered_input_int) print (solution) if solution: modify_file_line("secret3_2.py" , solution, 20 ) send_post_res = send_post() print (send_post_res, solution[position]) if send_post_res != solution[position]: flags[position] = flag_chr print ("" .join(flags)) break
无法获得的秘密 首先模拟键盘输入可以把代码传进去。
一开始想传个二维码库进去,发现要传十分钟还是算了,还是直接这样:
然后二值化一下,识别中心点的黑白即可。自动化截图的流程,半个消失就能截完。
另外,可以分段sha256,看看某一段有没有错误。
还有这道题如果在半夜做,因为人少会比较流畅(
1 2 3 4 5 6 7 8 9 10 11 12 13 14 15 16 17 18 19 20 21 22 23 24 25 26 27 28 29 30 31 32 33 34 35 36 37 38 39 40 41 42 43 44 45 46 47 48 49 50 51 52 53 54 55 56 57 58 59 60 61 62 63 64 65 66 67 68 69 70 71 72 73 74 75 76 77 78 79 80 81 82 83 84 85 86 87 88 89 90 91 92 93 94 95 96 97 98 99 100 101 102 103 104 105 106 107 108 109 110 111 112 113 114 115 116 117 118 119 120 import pyautoguifrom PIL import Imageimport timeimport osgetcode_source_code = """ import os import sys def clear_terminal(): os.system('clear') def read_file_binary_and_print(file_path, start, end): clear_terminal() try: with open(file_path, 'rb') as file: file.seek(int(start)) data = file.read(int(end) - int(start)) # 将每个字节转换为二进制字符串,填充到8位,然后替换 binary_string = ''.join(f"{byte:08b}" for byte in data) transformed_string = binary_string.replace('1', '+').replace('0', '_') print(transformed_string) except Exception as e: print(f"Error: {e}") # 示例用法 file_path = '/secret' if __name__ == '__main__': start_position = sys.argv[1] end_position = sys.argv[2] read_file_binary_and_print(file_path, start_position, end_position) """ source_code_get_hash = """ import hashlib import sys def get_8bit_hash(data): # 使用SHA-256哈希函数 sha256_hash = hashlib.sha256(data).hexdigest() # 截取前8位作为8位哈希 return sha256_hash[:8] def hash_file_section(file_path, start, end): try: with open(file_path, 'rb') as file: # 移动到起始位置 file.seek(int(start)) # 读取从起始位置到结束位置的数据 section_data = file.read(int(end) - int(start)) # 计算8位哈希 hash_value = get_8bit_hash(section_data) print(f"Hash (first 8 chars): {hash_value}") except FileNotFoundError: print(f"File not found: {file_path}") except Exception as e: print(f"An error occurred: {e}") # 使用示例,从命令行参数中获取 if __name__ == '__main__': file_path = '/secret' start_position = sys.argv[1] end_position = sys.argv[2] hash_file_section(file_path, start_position, end_position) """ def simulate_keyboard_input (text ): """ 模拟键盘输入文本。 参数: text (str): 要输入的文本。 """ for i in range (0 , len (text), 100 ): print (i, "/" , len (text)) pyautogui.typewrite(text[i:i+100 ]) time.sleep(0.1 ) def take_screenshot_and_save (filename ): """ 截图并保存到指定文件。 参数: filename (str): 保存截图的文件名(包括路径和扩展名)。 """ screenshot = pyautogui.screenshot() screenshot.save(filename) import keyboarddef listen_for_hotkey (hotkey='ctrl+shift+alt+m' ): print (f"Listening for hotkey: {hotkey} " ) keyboard.wait(hotkey) print ("Hotkey detected!" ) return True time.sleep(0.5 ) for i in range (312000 , 524288 , 800 ): start = i end = i + 800 print (f"start: {start} , end: {end} " ) simulate_keyboard_input(f"python3 ./g.py {start} {end} \n" ) time.sleep(0.4 ) take_screenshot_and_save(f"images/image_{start} _{end} .png" ) time.sleep(0.4 )
1 2 3 4 5 6 7 8 9 10 11 12 13 14 15 16 17 18 19 20 21 22 23 24 25 26 27 28 29 30 31 32 33 34 35 36 37 38 39 40 41 42 43 44 45 46 47 48 49 50 51 52 53 54 55 56 57 58 59 60 61 62 63 64 65 66 67 68 69 70 71 72 73 74 75 76 77 78 79 import hashlibimport cv2import structimport osimage_folder = 'images' start_file_index = 0 end_file_index = 524800 step = 800 start_x, start_y = 328 , 158 x_interval = 13.126 y_interval = 26.25 cols = 143 rows = 45 all_binary_data = [] for file_index in range (start_file_index, end_file_index, step): image_path = os.path.join(image_folder, f'image_{file_index} _{file_index + step} .png' ) original_image = cv2.imread(image_path) image = cv2.imread(image_path, cv2.IMREAD_GRAYSCALE) if image is None : print (f"File not found: {image_path} " ) continue _, binary_image = cv2.threshold(image, 50 , 255 , cv2.THRESH_BINARY_INV) binary_data = [] cnt = 0 row = 0 while cnt < 800 * 8 : for col in range (cols): center_x = round (start_x + col * x_interval) center_y = round (start_y + row * y_interval) if binary_image[center_y, center_x] < 100 : binary_data.append(1 ) cv2.circle(original_image, (center_x, center_y), radius=0 , color=(0 , 0 , 255 ), thickness=-1 ) else : binary_data.append(0 ) cnt += 1 if cnt >= 800 * 8 : break row += 1 for i in range (0 , len (binary_data), 8 ): byte = 0 for bit in binary_data[i:i + 8 ]: byte = (byte << 1 ) | bit all_binary_data.append(byte) print (f"Processed: {file_index} - {file_index + step} " ) output_file_path = f'output_{start_file_index} _{end_file_index} .bin' with open (output_file_path, 'wb' ) as f: f.write(bytearray (all_binary_data)) sha256_hash = hashlib.sha256(bytearray (all_binary_data)).hexdigest() print (f"SHA-256 Hash: {sha256_hash[:8 ]} " )print (f"{output_file_path} generated." )
Docker for Everyone Plus 在windows里,用securecrt这个客户端可以正常使用ZMODEM。
第一题 一眼也是没什么思路,那么看看第二题加了什么限制。
发现限制了device和privileged这俩参数。那么第一题可以privileged以及挂载/dev/vdb。
然后发现实际上可以用-u 1000:1000 -u 1000:0来控制用户组为root。而root用户组是可以访问/dev/vdb的。
第二题 高强度搜索docker相关漏洞,从https://psych.green/2024/03/02/Docker%E5%AE%B9%E5%99%A8%E9%80%83%E9%80%B8/ 可以得到一个利用docker.sock来逃逸的漏洞。
具体来说,这个文件是docker客户端和docker守护进程通信的文件。我们通过修改宿主机里的这个文件,就可以操控宿主机里的docker守护进程。例如,让宿主机里新建一个docker,并且以root权限挂载/dev/vdb。
然后docker.sock刚好是root用户组可以访问的。把它挂载进去虚拟机,然后
1 docker -H unix://var/run/docker.sock 让宿主机执行的docker参数
看不见的彼方:交换空间 这个感觉就是个操作系统大作业题(
第一题就很简单了,用共享内存交换。
第二题先把B的两个文件合并,然后和A交换,再把A拆成file1和file2.
合并需要能动态调整文件的大小,可以搜到truncate系统调用有这个功能。但它只能释放文件的尾部,不能释放头部。
假设我们要把file1和file2合并,可以这样做:从file2尾部每次读取一些字节,追加到file1头部,然后truncate file2里的这些字节。这样我们得到了文件file,它等于file1+逆序的file2.
然后在A里用相同方法分割之后,file2又回到了正序的。
最后就是要重命名,好像是没有重命名权限,一时想不到什么方法,就用truncate把文件复制两次(第一次之后会变成逆序,所以需要两次),这样就能改变文件名。
最后的最后,写的时候踩到一个大坑:
在自旋锁实现中,
1 2 3 while(1) { volitile asm("nop"); }
用 -Og编译,编译器还是会把整个循环优化掉。调了好几个小时一直以为是哪里有竞争,最后才发现是自旋锁的问题。。
需要
1 2 3 4 5 int a; while(1) { ++a; } printf("%d", a);
ZFS文件恢复 只会做第一问。可以用send导出镜像文件,然后在windows里的UFS软件打开,可以直接搜到flag。
链上转账助手 第一问是直接拒绝交易,第二问是通过无限循环耗尽gas。代码给gpt写就完事了。
第三问不会。
不太分布式的软总线 也是让gpt写代码。
第一问 调用getflag1函数。
1 2 3 4 5 6 7 8 9 10 11 12 13 14 15 16 17 18 19 20 21 22 23 24 25 26 27 28 29 30 31 32 33 34 35 36 37 38 39 40 41 42 43 44 45 46 47 48 49 50 51 #include <gio/gio.h> #include <glib.h> #include <stdio.h> int main (int argc, char *argv[]) { GError *error = NULL ; GDBusConnection *connection; GVariant *result; gchar *flag1; connection = g_bus_get_sync(G_BUS_TYPE_SYSTEM, NULL , &error); if (connection == NULL ) { g_printerr("Failed to connect to system bus: %s\n" , error->message); g_error_free(error); return 1 ; } result = g_dbus_connection_call_sync( connection, "cn.edu.ustc.lug.hack.FlagService" , "/cn/edu/ustc/lug/hack/FlagService" , "cn.edu.ustc.lug.hack.FlagService" , "GetFlag1" , g_variant_new("(s)" , "Please give me flag1" ), G_VARIANT_TYPE("(s)" ), G_DBUS_CALL_FLAGS_NONE, -1 , NULL , &error ); if (result == NULL ) { g_printerr("Failed to call GetFlag1 method: %s\n" , error->message); g_error_free(error); g_object_unref(connection); return 1 ; } g_variant_get(result, "(s)" , &flag1); g_print("Flag1: %s\n" , flag1); g_variant_unref(result); g_free(flag1); g_object_unref(connection); return 0 ; }
第二问 忘记了。
1 2 3 4 5 6 7 8 9 10 11 12 13 14 15 16 17 18 19 20 21 22 23 24 25 26 27 28 29 30 31 32 33 34 35 36 37 38 39 40 41 42 43 44 45 46 47 48 49 50 51 52 53 54 55 56 57 58 59 60 61 62 63 64 65 66 67 68 69 70 71 72 73 74 75 76 77 78 79 80 81 82 83 84 85 86 87 88 89 90 91 #include <gio/gio.h> #include <glib.h> #include <stdio.h> #include <stdlib.h> #include <unistd.h> #include <fcntl.h> int main (int argc, char *argv[]) { GError *error = NULL ; GDBusConnection *connection; GUnixFDList *fd_list; GUnixFDList *out_fd_list = NULL ; GVariant *result; gchar *flag2; int pipe_fds[2 ]; GCancellable *cancellable = NULL ; const char *message = "Please give me flag2\n" ; if (pipe(pipe_fds) == -1 ) { g_printerr("Failed to create pipe.\n" ); return 1 ; } write(pipe_fds[1 ], message, strlen (message)); close(pipe_fds[1 ]); connection = g_bus_get_sync(G_BUS_TYPE_SYSTEM, NULL , &error); if (connection == NULL ) { g_printerr("Failed to connect to system bus: %s\n" , error->message); g_error_free(error); close(pipe_fds[0 ]); return 1 ; } fd_list = g_unix_fd_list_new(); g_unix_fd_list_append(fd_list, pipe_fds[0 ], &error); if (error != NULL ) { g_printerr("Failed to append file descriptor to list: %s\n" , error->message); g_error_free(error); g_object_unref(fd_list); g_object_unref(connection); close(pipe_fds[0 ]); return 1 ; } result = g_dbus_connection_call_with_unix_fd_list_sync( connection, "cn.edu.ustc.lug.hack.FlagService" , "/cn/edu/ustc/lug/hack/FlagService" , "cn.edu.ustc.lug.hack.FlagService" , "GetFlag2" , g_variant_new("(h)" , 0 ), G_VARIANT_TYPE("(s)" ), G_DBUS_CALL_FLAGS_NONE, -1 , fd_list, &out_fd_list, cancellable, &error ); if (result == NULL ) { g_printerr("Failed to call GetFlag2 method: %s\n" , error->message); g_error_free(error); g_object_unref(fd_list); g_object_unref(connection); close(pipe_fds[0 ]); return 1 ; } g_variant_get(result, "(s)" , &flag2); g_print("Flag2: %s\n" , flag2); g_variant_unref(result); g_free(flag2); if (out_fd_list != NULL ) { g_object_unref(out_fd_list); } g_object_unref(fd_list); g_object_unref(connection); close(pipe_fds[0 ]); return 0 ; }
第三问 也是忘记了。。好像是自己写一个getflag3.
1 2 3 4 5 6 7 8 9 10 11 12 13 14 15 16 17 18 19 20 21 22 23 24 25 26 27 28 29 30 31 32 33 34 35 36 37 38 39 40 41 42 43 44 45 46 47 48 49 50 51 52 53 54 55 56 57 58 #define _GNU_SOURCE #include <fcntl.h> #include <gio/gio.h> #include <stdio.h> #include <stdlib.h> #include <sys/mman.h> #include <unistd.h> #define DEST "cn.edu.ustc.lug.hack.FlagService" #define OBJECT_PATH "/cn/edu/ustc/lug/hack/FlagService" #define METHOD "GetFlag3" #define INTERFACE "cn.edu.ustc.lug.hack.FlagService" int main () { GError *error = NULL ; GDBusConnection *connection; GVariant *result; gchar *flag3; connection = g_bus_get_sync(G_BUS_TYPE_SYSTEM, NULL , &error); if (!connection) { g_printerr("Failed to connect to the system bus: %s\n" , error->message); g_error_free(error); return EXIT_FAILURE; } result = g_dbus_connection_call_sync(connection, DEST, OBJECT_PATH, INTERFACE, METHOD, NULL , G_VARIANT_TYPE("(s)" ), G_DBUS_CALL_FLAGS_NONE, -1 , NULL , &error); if (result) { if (g_variant_is_of_type(result, G_VARIANT_TYPE("(s)" ))) { g_variant_get(result, "(s)" , &flag3); g_print("Get result: %s\n" , flag3); g_free(flag3); } else { g_printerr("Unexpected return type from D-Bus method.\n" ); } g_variant_unref(result); } else { g_printerr("Error calling D-Bus method %s: %s\n" , METHOD, error->message); g_error_free(error); } g_object_unref(connection); return EXIT_SUCCESS; }
RISC-V:虎胆龙威 只会做第二问。
既然内存不能用,那就直接在寄存器上排序就好了。反正有32个寄存器,够用。
汇编代码写了1000行,没有用循环,总之很暴力。
实际上第一问应该也好做,当时实在太困了没发现shift指令是可以用的。
动画分享 第一题 问O1可以得到一个rust字符串切片的特性:从utf8字符中间切片会导致崩溃。
所以传GET 你好就行。
第二题 可以搜到zutty的相关cve。在本地配置好zutty环境(配了半天)进行测试,发现程序printf显示那个poc后,还需要停止,才能让zutty执行命令。
(有人和我一样先做出的第二题发现还要用到第一题的东西吗
关灯 只会前3问。把对应的异或关系整理出来,然后z3solver。
1 2 3 4 5 6 7 8 9 10 11 12 13 14 15 16 17 18 19 20 21 22 23 24 25 26 27 28 29 30 31 32 33 34 35 36 37 38 39 40 41 42 43 44 45 46 47 48 49 50 51 52 53 54 55 56 57 58 59 60 61 62 63 64 65 66 67 68 69 70 71 72 73 74 75 76 77 78 79 80 81 82 83 84 85 86 87 88 89 90 91 92 93 94 95 96 97 98 99 100 101 102 103 104 105 106 107 108 109 110 111 112 113 114 115 116 117 118 119 120 121 122 123 124 125 126 127 128 129 130 131 132 133 134 135 136 137 138 139 140 141 142 143 144 145 146 147 148 149 150 151 152 153 154 155 156 157 switches = [] n = 11 for i in range (n**3 ): switches.append([]) def get_turple (idx ): l1 = idx // n*n l2 = (idx % n*n) // n l3 = idx % n return l1, l2, l3 def getswitchs0 (): for l1 in range (0 , n): for l2 in range (0 , n): for l3 in range (0 , n): s1 = l1 s2 = l2 s3 = l3 idx_l = l1 * n*n + l2 * n + l3 idx_s = s1 * n*n + s2 * n + s3 switches[idx_l].append(idx_s) def getswitchs1 (): for l1 in range (0 , n - 1 ): for l2 in range (0 , n): for l3 in range (0 , n): s1 = l1 + 1 s2 = l2 s3 = l3 idx_l = l1 * n*n + l2 * n + l3 idx_s = s1 * n*n + s2 * n + s3 switches[idx_l].append(idx_s) def getswitchs2 (): for l1 in range (1 , n): for l2 in range (0 , n): for l3 in range (0 , n): s1 = l1 - 1 s2 = l2 s3 = l3 idx_l = l1 * n*n + l2 * n + l3 idx_s = s1 * n*n + s2 * n + s3 switches[idx_l].append(idx_s) def getswitchs3 (): for l1 in range (0 , n): for l2 in range (0 , n-1 ): for l3 in range (0 , n): s1 = l1 s2 = l2 + 1 s3 = l3 idx_l = l1 * n*n + l2 * n + l3 idx_s = s1 * n*n + s2 * n + s3 switches[idx_l].append(idx_s) def getswitchs4 (): for l1 in range (0 , n): for l2 in range (1 , n): for l3 in range (0 , n): s1 = l1 s2 = l2 - 1 s3 = l3 idx_l = l1 * n*n + l2 * n + l3 idx_s = s1 * n*n + s2 * n + s3 switches[idx_l].append(idx_s) def getswitchs5 (): for l1 in range (0 , n): for l2 in range (0 , n): for l3 in range (0 , n-1 ): s1 = l1 s2 = l2 s3 = l3 + 1 idx_l = l1 * n*n + l2 * n + l3 idx_s = s1 * n*n + s2 * n + s3 switches[idx_l].append(idx_s) def getswitchs6 (): for l1 in range (0 , n): for l2 in range (0 , n): for l3 in range (1 , n): s1 = l1 s2 = l2 s3 = l3 - 1 idx_l = l1 * n*n + l2 * n + l3 idx_s = s1 * n*n + s2 * n + s3 switches[idx_l].append(idx_s) getswitchs0() getswitchs1() getswitchs2() getswitchs3() getswitchs4() getswitchs5() getswitchs6() print (switches)from z3 import *x = [Bool(f'x_{i} ' ) for i in range (n**3 )] solver = Solver() def multi_xor (variables ): if len (variables) == 1 : return variables[0 ] else : return Xor(variables[0 ], multi_xor(variables[1 :])) constraints = [] constraint_res_str = "01010000100001011000011001111010011001000000001111010101100011110101010001110010011100101100000001101001000111010100001110100101011011110100101110010111111111001111001100110110011010010110011110110110111011101100000001100011010000111000001011110111010110000101010110001110011101001111100100111010011010111100101101100110100100101100110101110001110000010111001110010110011100101010101010101011110010010011001111100111010000111110010111100011101110001110101110011101011000011111010010000111100101101011010011011110111110101100101000010101010110010010010110010010001000001101011100111011110110110100101010100011100010110011100000010101111111001010111001101011100010100000110111111110100011010100011001111000001000110011110110100010111010101110000110101110111000000111100010011111111111100101111101111001101111001010111010111100011111001100111111100110110100011001111010010100110001100100111100001100001011011010111000100111111000110010011110000010011001101101111111100101111111100000100001011111010011100100110011110001000111111111111010100001111100011101001000111010100100101100101101111100110000101011001010110011110101011010100101101000111110100011001010010101111111101010001111101001100000111100100001101010100111001011101010101010101011000101101011110010100100101010010101011100010111001001010110110010000100010111010101010011101" for i in range (n**3 ): constraints.append((switches[i], int (constraint_res_str[i]))) for indices, result in constraints: variables = [x[i] for i in indices] solver.add(multi_xor(variables) == (result == 1 )) if solver.check() == sat: model = solver.model() solution = [is_true(model[x[i]]) for i in range (n**3 )] solution_str = "" .join(map (lambda x: "1" if x else "0" , solution)) print (solution_str) else : print ("No solution found." )
禁止内卷 有提示
而且有的时候助教想改改代码,又懒得手动重启,所以还开了 --reload。
所以自己写个服务端,直接去把服务端python文件给覆盖了就行。
哈希三碰撞 只会第一问。就是0xfF和0xff会解析成同一个二进制,又能绕过检测。
零知识数独 第一问模拟键盘输入就行。
第二问用一下零知识证明相关的库,不需要有什么逆向。
第二问应该只是让做第三问的人让人熟悉一下zk这些库吧,可惜第三问没去做。
1 2 3 4 5 6 7 8 9 10 11 12 13 14 15 16 17 18 19 20 21 22 23 24 25 26 27 28 29 30 31 32 33 34 35 36 37 38 39 40 41 42 43 44 45 46 47 48 49 50 51 52 53 54 55 56 57 58 59 60 61 62 63 64 65 66 67 68 69 70 71 72 import timeimport pyautoguiclass Solution (object ): def solveSudoku (self, board ): def isvaild (i,j ): for m in range (9 ): if m!=i and board[m][j]==board[i][j]: return False for n in range (9 ): if n!=j and board[i][n]==board[i][j]: return False for m in range (i//3 *3 ,i//3 *3 +3 ): for n in range (j//3 *3 ,j//3 *3 +3 ): if m!=i and n!=j and board[m][n]==board[i][j]: return False return True def f (a,b,board ): for i in range (a,9 ): for j in range (b,9 ): if board[i][j]=='.' : for c in '123456789' : board[i][j]=c if isvaild(i,j): if f(a,b,board):return True else : board[i][j]='.' else : board[i][j]='.' return False return True f(0 ,0 ,board) return board with open ("html.txt" ) as f: html = f.read() values_html = html.split("value=\"" ) values = [] tmp_values = [] for value_html in values_html[1 :]: value = value_html.split("\"" )[0 ] if value == "" : tmp_values.append("." ) else : tmp_values.append(value) if len (tmp_values) == 9 : values.append(tmp_values) tmp_values = [] print (values) s=Solution() board = values time.sleep(0.5 ) idx = 0 auto_str = "" for line in s.solveSudoku(board): for value in line: idx += 1 auto_str += f"{value} \t" pyautogui.typewrite(auto_str)
先不说关于我从零开始xxx(LLM) 第一题 用github下载的英文词表对照,还是死活做不出来。后来用llm生成很多次,整理成词表,发现有个xxxx我一直翻译成race,实际上可以是game,就过了。
第二题 大模型是一个一个token输出的:从某段文本生成一个token,然后加入该文本末尾,继续生成。
即使seed不同,一样的输出token肯定也在概率最高的几个里面。
基于这两点,可以进行dfs。
关于让llama从某个前缀开始生成,可以先调试定位到它添加<|im_end|>\n<|im_start|>assistant\n的地方,然后把添加这个后缀的代码去掉。具体在llama_chat_format.py 的575行左右。
另外这玩意是可以上卡的,不过编译gpu版本需要很长时间。开始写代码之前新建一个venv装gpu版本的llama cpp,代码写完也差不多编译好了。用自己机器上4060,总体还是快很多的。
1 2 3 4 5 6 7 8 9 10 11 12 13 14 15 16 17 18 19 20 21 22 23 24 25 26 27 28 29 30 31 32 33 34 35 36 37 38 39 40 41 42 43 44 45 46 47 48 49 50 51 52 53 54 55 56 57 58 59 60 61 62 63 64 65 66 67 68 69 70 71 72 73 74 75 76 77 78 79 80 81 82 83 84 85 86 87 88 89 90 91 92 93 94 import randomfrom llama_cpp import Llama, llama_cppimport sysimport ioimport jsonimport hashlibfrom copy import deepcopyimport tracebacksys.stdout = io.TextIOWrapper(sys.stdout.buffer, encoding='utf-8' ) def check_is_valid (token, offset ): len_token = len (token) for i in range (len_token): if after_txt[offset + i] == "x" : if token[i] not in "hackergame of ustcx" : return False else : if after_txt[offset + i] != token[i]: return False return True with open ("vocab.txt" , "r" , encoding="utf-8" ) as f: vocab = f.read().splitlines() llm = Llama( model_path="qwen2.5-3b-instruct-q8_0.gguf" , n_ctx=1024 , seed=random.SystemRandom().randint(0 , 2 **64 ), logits_all=True , n_gpu_layers=-1 ) with open ("after.txt_bak" , "r" , encoding="utf-8" ) as f: after_txt = f.read() expected_len = len (after_txt) def guess_token (before: str ): if len (before) == expected_len: if hashlib.sha256(before.encode()).hexdigest() == "f0d1d40fdef63ea6a6dc97ba78a59512deb07ad9ecad1e3fd16c83151d51fe58" : print ("SUCCESS!!!!!!!" ) print (before) exit() if " " in before: return messages=[ { "role" : "system" , "content" : "You are a professional CTF player." }, { "role" : "user" , "content" : "Write a short article for Hackergame 2024 (中国科学技术大学 (University of Science and Technology of China) 第十一届信息安全大赛) in English. The more funny and unreal the better. About 500 words.<|im_end|>\n<|im_start|>assistant\n" , }, ] messages[-1 ]["content" ] += before print (f"guess({len (before)} )" , flush=True ) offset = len (before) while True : try : completion = llm.create_chat_completion( messages=messages, logprobs=True , top_logprobs=10 , max_tokens=1 ) break except ValueError as e: traceback.print_exc() before_contest = llm.tokenize(messages[-1 ]["content" ]) before_contest = before_contest[1 :] messages[-1 ]["content" ] = llm.detokenize(before_contest).decode() continue top_logprobs = completion["choices" ][0 ]["logprobs" ]["top_logprobs" ] for token, prob in top_logprobs[0 ].items(): if token == "" : continue if check_is_valid(token, offset): guess_token(before + token) first_before = "" print ("start" )guess_token(first_before)